New Years Apron Cheers!

For New Years Eve 2022 I made me a new apron! I usually like to wear an apron when I am cooking and after wearing a pretty Christmas apron I really wanted another one that could be my New Years Apron!
To draft the pattern I used my Christmas apron and placed it over the black linen (folded) and trace it all around, added seam allowances and then cut it.
I knew I wanted to put some applique on the front of the apron but I was not sure what…? I was thinking to draw some champagne bottles to sew them as fabric appliques, but then I decided to just do a simple word: Cheers!
I used as a guide for the letters a picture I found on Pinterest. I drew the letters by hand and then I turned those paper letters into appliques (fabric stickers!)


As a subscriber to my newsletter you will get the free pattern of the word: “Cheers” or find it in my Etsy shop! But you can also use the computer and printer to create your own letters. Here there are (roughly) the measurements of my letters: The bigger letters are around 5.5 inches tall, 3.75 inches for the medium letters and 2 inches for the little ones. (14 cm - 9.5 cm - 5 cm)
After I drew my letters I prepared a square or rectangle of fabric big enough to fit all the letters. I suggest for the fabric used in the letters to be a color that will have a good contrast with the background fabric.
The fabric for the letters must be interfaced with light fusible interfacing and also it needs a layer of wonder under on top of the interfacing. Then the letters will be ready to trace on the wrong side of the fabric and cut.
*Wonder under is a fusible web.
Remember to flip the letter’s paper pattern when placing them on the wrong side of the fabric. The letters must be flipped so they will be on the right direction when they are cut and you look at them from the right side of the fabric.
*My suggestion is to finish all the edges of the apron before decorating the apron with the applique, in that way the applique will be on the right position in relation to the apron.


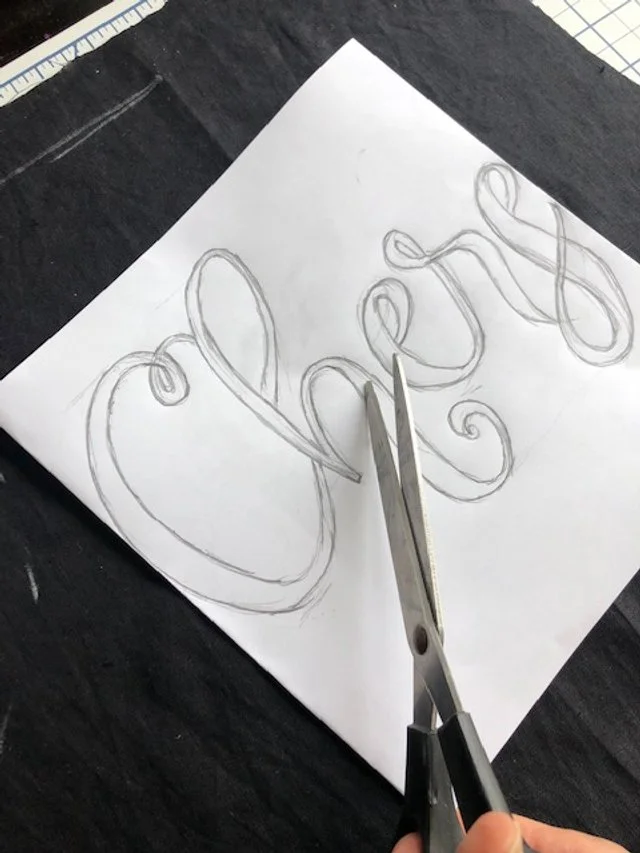
After tracing the letters, I first cut any little holes that the pattern had, ex: on the letter “e” the center part must be cut first. I used an stiletto over the cutting mat to cut the little details but scissors will work too. After the small holes are cut then I cut the letters with scissors. Do this part slowly so you get a nice cut and the shape of the letters stay true to the pattern. This will ensure that the embroidery will be much easier to do and the end result will be very nice!

Next is to place the letter fabric appliques on the base fabric. You can choose where and how you want them to be on your apron. I placed mine right over the chest area. When you are sure where you want the letters to go then fuse them very well with an iron and lots of steam! The letters will glue to the base fabric because of the wonder under that was applied on the back of the fabric for the letters.
*If you can not find wonder under, use craft glue to keep the letters in place while embroidering them. You might need to add a few pins to hold them better.

Next is to embroider each letter! This part takes a while, I will not lie! But just have some nice music, a nice podcast to listen to and just sew along! I leave the ends and beginning threads hanging long because I do not backstitch it with the sewing machine. I actually secure the stitches with a needle by hand…I know it is an extra step but I like how seamless the effect is when I do not see the backstitches of the sewing machine. But you can definitely just backstitch by machine at the beginning and end of each letter you embroider.


I really liked how the applique looked! The letters on my apron really popped and I liked the movement of the letters. I was very happy with this sewing project and I am very happy to share it with all of you here! I would love it if you give it a try! For my letters I used an old necktie from my husband. In my head I had the idea of golden tones over the black linen so the only closest material I had on hand was a recycled silk necktie, it worked great!!
Always remember that sometimes you can just re use old garments, tea towels, neckties…etc and give them a new purpose and look!
These letters can be embroidered to a pillowcase, tote bag, etc. When printing the file you can choose a different size to make the letters smaller or bigger. I printed it at 58% to do an smaller version and cut them on cork and glued the letters with fabric glue to a piece of linen to make a fabric card!

While I was working on this smaller version, I was also thinking you could use this pattern of the word Cheers as a template to embroider it all by hand on an embroidery hoop! Decorated with tiny embroidered flowers around, etc, and etc! There is always a reason to send a Cheers to somebody or to ourselves! (Feel free to use this pattern or template, if you do, please tag me on social media @gypsytailor so I can see your work and also my pattern can be shared with others and they can find my page and website!)
The embroidery can be done by hand too, or by machine with a more open stitch. You can learn more about this in my Skillshare class where I teach more in detail about fabric appliques! If you take my class the pattern for the letters is included in the class!
I hope you have a lot of fun sewing!!
SEWING THE APRON
Materials
The fabric for the apron could be a cotton, linen, denim, canvas. (1 yard)
I used a recycled silk necktie for the letters. Use any scraps of fabrics.
Light interfacing to fuse the fabric for the letters.
Wonder Under to fuse to the back of the fabric for the letters.
Thread, scissors, craft glue.
Iron, sewing machine with zigzag stitching.
Embroidery floss for any extra decoration (ex: I embroidered 2 wine glasses on the pocket)
Ribbons for the neck strap and the belt.
PICTURES 1 - 9 TO FOLLOW INSTRUCTIONS BELOW:


The measurements of the apron are around:
Length: 31 inches (78.5 cm)
Width at waist: 19.5 inches (49.5 cm)
Width at chest: 10.75 inches (27.3 cm)
Pocket size: 11.75” wide x 7.25” tall ( 30 cm x 18.5 cm)
Sewing process:
After cutting the apron and the pocket I first started working with the pocket. All the sides of the pocket can be either serged, zigzagged, to prevent fraying, or do none of those and just fold the seams, twice for the top edge and topstitch it, see picture 2. Then fold the other 3 sides and topstitch the 3 sides over the apron at the right position. I also run a seam in the middle of the pocket. I finished the corner with a little triangle to secure the pocket better. See picture 8
Finishing all the edges of the apron:
The way I did it: Fold twice the edges all around, that way all you have to do is topstitch them. To fold the edges twice I used the iron and did one fold first at 1/4” then another fold again at 1/4”. If your iron has good steam it will crease the fabric very well so all you need after folding and creasing is to topstitch all around. If you are a beginner sewist feel free to mark on the edges the 1/4'“ for the first fold then for the next fold use the first fold as a guide. Also, if you are beginner sewist you can baste by hand the folded edges before topstitching by machine. That extra step of basting by hand will prove to be very helpful if you are beginner sewist, do not feel bad for doing this extra step. I used to baste by hand so much when I started sewing, it seems like is extra work but in reality it can save you a lot of time and frustration.
See in picture 3 above how I folded the edges before topstitching. In picture 4 you can see the topstitch.
After all the edges of the apron are finished then you can decorate your apron with the letter appliques or any decoration.
* Note that for the top edge of the apron I folded the seam 1” with a 1/4” seam allowance and at the hem I folded the seam 3/4” plus 1/4” seam allowance.
The belt and the strap:
To sew the belt and neck strap I folded the ribbons twice at the ends (the ends that will be attached to the apron, the other end of the belt was just cut with the scissors) I pined it to the back of the apron so the folded ends of the ribbons are touching the wrong side of the fabric, and then I sew them in place by topstitching over the original stitch of the edge and then adding an extra topstitch just to ensure the belt is attached securely. See pictures 5, 6 and 7.

The last step is to sew the label!
I hope this tutorial is helpful to you and you can try sewing an apron!! Use a fabric with a pretty print, add an applique to a solid color fabric, embroider your initials, a pretty flower, some wine glasses or use a tea towel! That is what I used to make my Christmas apron. The tea towel is from Rebecca Jane Woolbright, she has beautiful tea towels!
Happy sewing friends!
Please contact me anytime! I would love to see your projects and I hope the free pdf is useful and fun to use! Thanks so much for joining my newsletter!
When you subscribe to my newsletter you will receive a free pattern to make a fabric basket and you will receive a pattern for the word: Cheers
Your sewing friend,